Showing posts with label Guest Post. Show all posts

Friday, February 17, 2012

GUEST POST: How to create the perfect brow shape

Finding the perfect shape for your eyebrows can really transform your features and make the most of them. The wrong shape can make your face appear too long or too wide, and draw attention away from your most important asset: your eyes! However, it's easy to work out how to style your eyebrows in a way that suits you, and use an eyebrow pencil to achieve it. Follow this quick step by step guide to creating the perfect brow:

1. Determine your face shape

After a shower, pull your hair back from your face and stand in front of a mirror. There are six main face shapes: oval, round, long, square, heart and diamond. To determine which one you are look at three main areas - your forehead, your cheeks and your chin. The ratio of each of these in relation to each other will signify your face shape.
source

2. Match your face shape to a complimentary brow shape

Now you know your face shape, you can find the brow that will best suit you. Oval, long and square face shapes lend themselves to a straight, strong brow while diamond, round and heart shapes benefit from gentle curves. It’s all about balancing the proportions of your face and creating the illusions of space and with where needed.

3. Pluck away!

Invest in a good quality set of tweezers. It is good to have a slanted pair and also a pointed tipped pair to catch any fine hairs. Using a soft eyebrow brush, brush your eyebrows upwards towards your forehead to see the natural shape. To begin with, tidy the hairs that do not follow your natural brow line. If you are using a hand mirror be sure to step away and look into a larger one every few plucks to keep on top of the overall look and not get carried away. When you have plucked to your natural shape brush down your eyebrows and shape them with your fingers.
source

4. Get styling

If you are not yet sure about a permanent brow change, an eyebrow pencil is a great way to experiment. Make sure the colour you use is an exact match to your hair colour. You know the shape you want to achieve after your face shape analysis, so working from the inside edge of your eyebrow, use small, light strokes to fill an define as you need to. You can use petroleum jelly to set your brows in place.

5. Need more help?

There are some great eyebrow stencils available to buy from high street stores, many of which use celebrity inspirations so that you know which look you will be aiming for. Stencils are easy to use, but keep checking your face in a large mirror to make sure you are not creating a look that's too severe. You want to keep your brows soft and feminine!

Guest Post contributed by Emma Beecroft from Cafe La Moda, the social space for beauty tips and makeup advice.

Saturday, February 11, 2012

GUEST POST: Valentine's Day Nail Art

Guest Post written by: Dimpal Rathore

With V-Day looming in the near horizon all my giveaway guest post entries are revolving around it and who is complaining?  I am truly loving it :) Dimpal blogs at  http://crazypolishes.blogspot.in/ and is a nail polish and nail art fanatic! Let's see what she has in store for us...

Hello Beauties ,
I am Dimpal. I am so happy and excited to write my first blog post ever .
This is valentine week and I can see lots of love in the air and so in the blogs.
Here, I am gonna show you a very simple valentine nail art which doesn’t need any special tool or
accessories. You will need following things:
A base coat: I used Sally Hansen Double Duty Strengthening base coat
A white nail polish : I used collection 2000’s French White
A pink or red nail polish: I used Colorama sexy
A top coat: I used Chambor’s top coat
A dotting tool or toothpick

First apply base coat to protect nails. After that apply 2 coats of white nail polish.

Using a dotting tool (or you can use tooth pick also) draw alphabet “I”, a heart and “U” on your middle finger’s nail.
  

Paint rest of your nails diagonally with pink color. Using a toothpick, draw little pink hearts on white portions of nails.
  

Then make little white dots on border of pink color.

Finally apply top coat and Tah-Dahh your Valentines Nails are ready.

Please let the polish dry atleast 15-20 mins before applying top coat so all the layers get dry completely
and thus avoid any mess up. The pink polish is very bright in shade but because I clicked these pics
with flash, it’s looking little dull.

I Hope you guyz enjoyed the tutorial of this very simple nail art.

Aren’t they cute!!!


Luv
Dimpal

Wednesday, February 8, 2012

GUEST POST: Valentine's Day Look and Tutorial

Guest Post by Bidisha

You all know that I have a giveaway underway on ISimplyLoveMakeUp where I will have two winners. One winner wins a GlossyBox and another winner will win three of my favorite lipsticks :) If you haven't entered it yet then worry not beauties you can still enter it here. As a part of one of the rules, Bidisha from http://glisteningkaleidoscopiceyes.blogspot.in has very sweetly done a guest post about a Valentine's Day look and a tutorial :) I wont introduce her to you all just yet, for that you'll have to be a little more patient and wait for a couple of more days ;) So over to her for now...
Hello everyone...
This is Bidisha here
I am so excited today to write a post for my adorable friend suma <3
So today i thought of doing an easy eyemakeup tutorial for you all
This particular eyemakeup can be done during day and is also suitable for evening !
In this tutorial I used sponge applicator instead of brushes.
So lets get started with the tutorial
Here is the step by step pictoral demonstration >>>>>>>

1.First apply concealer around your eyes to hide the darkness (if any)
2.Then apply a mauvish silver frost eyeshadow all over the eyelids (I used Deborah Milano Ombretto mono hi-tech eyeshadow)
3.Then apply a taupy/bronzy brown eyeshadow on the outer corner of your eyes (I used the brownish shade from Lakme botanica eyeshadow quartet)
4.In order to give a twist to your eyemakeup, apply a burgundy/cranberry colour eyeshadow on the transition area where the mauve and brown meets; don't forget to blend the colors well. (I used the cranberry shade from the Botanica quad again)
5.Then apply your favourite black kohl liner on the waterline.
6.To intensify the eye makeup, line your upper lashline with that black kohl liner instead of liquid liner.
7.Finally finish off the makeup using a good black mascara on the lashes ! (I used Maybelline colossal volume mascara)

And here's the final look >


I hope you all liked this eye makeup tutorial
On my face i just applied Lakme rose powder and on my lips i used my favourite Avon lip balm in cherry
Since this is an eye makeup tutorial i didn't focus much on blush and lipstick !
I hope you all enjoyed this quick tutorial...
Do comment to share your views :)
with love,
Bidisha !

Thursday, October 13, 2011

GUEST POST: Casual Look For Office

Written By: Kannu


Today I decided to wear my favorite tunic with tights at work. I totally love teaming tights with tunics as I find it a very relaxed & easy going combination. Also I am very fond of neutral tones be it apparel, footwear, accessories or even makeup …

Outfit Details:
Tunic from GK I, tights from Snowhite , CP, footwear from Enroute, multi rounds bangle , gifted & Ed Hardy watch in black.
My Overall Look
 Makeup Details:
I wanted to add a color to my look so decided to do makeup with some blue in it…..
This is what I did
My Make-up for office
I generally prefer wear metallic eye makeup and neutral toned lips. Here I have done metallic blue eyes and pale nude almost Kim Kardashian type lips ;)
Closeup of the eyes
Closeup of the lips
Products Used:
Coloressence Pearl effect eye shadow pencil in Electric Blue, Maybelline The Colosal Volume Express Weatherproof Mascara in Black, Maybelline Diamond Glow by Eye Studio in shade 01 Copper Brown, Bharat & Dorris Creamy Matt lipstick in shade#103 & Lord& Berry Silk Kajal Kohl eye pencil #1001 Black.
Products used for this look!
Ever since I have got this shade of Bharat & Dorris lipstick I am hooked to it ……I just hope we have their store in Delhi soon ……

Hope you guys enjoyed reading the article


Kannu has her own blog about fashion, beauty, gossip and cooking! Check it out here

Friday, October 7, 2011

REVIEW & LIP SWATCH: Deborah Milano Lipstick in Atomic Red

Post By: Megha
Ladies and gentlemen... May I present to you our second guest post of the day. Megha also hails from "dil dil dilli" and sh is reviewing another brand that has never been featured on "isimplylovemakeup" as yet... Deborah Milano Lipsticks...
Deborah Milano Lipstick
What the company claims about the Lipstick:

·         Lipstick with a luminous, silky finish. Innovative formula produces pure, vibrant color. 
·         Glides on easily and feels comfortable all day long. Hypoallergenic.*

Price:
INR 480

Packaging:
Metallic colored casing, to give it a hard and shiny look.

Shade Card:
The shades available in this range
My take on Deborah Milano rossette atomic red lipstick shade 03:
Hii…
I  am a working girl. These days I have been reading a lot about RED, PEACHES ,ORANGES..All the beautiful colors.
Once you wear it,you look beautiful automatically and be it any skin color,You will start glowing itself.
So I have been looking for  a nice peachy shade these days to compliment my skin tone as well as with a stay power.
In a Delhi mall ,I passed through this kiosk of DEBORAH MILANO.The name seems to be directly from France and gives you french feeling…aahh!!
I got my eye on this color Rosetto Atomic red ,Shade no. 03.

About the Color:
It’s a gorgeous peachy orange color in a matte look.
No shine and glossy look. Its very natural peach color that’s why can be worn daily.
Yayyyyyyy!!

They have many shades i.e around 15 shades to choose out one for your lips but I liked the most is 03 SHADE.
Gives you fresh and young look ,evrytime you put it on your lips.
Very Hydrating.

And colorstay power is also fine ,if you don’t have habit of licking your lips too often.
It can stay for 2 hrs depending upon your carrying capability.

Swatches on HAND:
Hand swatch
On LIPS:
Lip Swatch
First Application:

After 2hrs of application:

PROS:
1.       Its a very hydarting Lipstick brand.Its a new name but giving it a try will never let you repent.
2.       Colorstay power is fine with me i.e 2 hrs.
3.       I can manage for this beautiful color anyhow..
4.       Packaging is nice.A metallic colored casing is provided.
5.       Easy and handy.
6.       Fruity Smell.
7.       Soooooperrrrrrrr  lovely color.

Cons:
1.       If color stay would be a bit more like for 4hrs,it would be a boon .:))).But still I love it.
2.       Cost is a bit on higher side but still I will afford it anyhow..:D
3.       And yes availability may be a big con.

All the best to all of you if you want to find this color and brand “Deborah Milano” for yourself.

Rating:
4.7/5..I am lovin’ it….
Will buy this brand again for sure ,but may be this shade again or a different shade.
Megha also has her own blog here

Thursday, October 6, 2011

REVIEW: Bharat and Dorris Cream Eye Liners

Post by: Kannu

Ladies and gentlemen... Please put your hands together for our first guest post and also an entry post for the giveaway :)
Btw, have you guys entered the giveaway as yet? No? Really? Why? LOL... You could check out the giveaway here :)
So anyways coming back to our guest blogger, let me introduce you all to Kannu Mankatala Wadhwa. She is from dil waalon ki dilli (Delhi) and will be reviewing this professional range of makeup from Bharat and Dorris :)


Applying eyeliner was always a very difficult exercise for me until I started using gel liners.
Gel liners are very convenient to use and have a long lasting effect.
I went to Pune last week where I discovered this make up brand called “Bharat & Dorris”.
Well to be honest I had never heard about this brand before or seen it anywhere in Delhi & NCR.
The B&D store was quite huge and attractive so unlike any other girl I got tempted to visit the store.
So this was my first visit to a B&D store and I must say I am very impressed !!!!
B&D offers a wide range of gel liners , the range consists of colors like silver, golden , red, purple, green, blue,brown ,hot pink and many more !!!!
I bought two cream liners, though deciding the colors was a very tough decision you see but then settled with brown & green for the time being. Have already asked my co-sister to get me more in Purple & Blue when she comes to Delhi around Diwali J
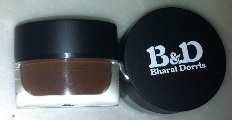
This is how the packaging looks like……
Bharat & Dorris Cream Eye Liner
Bharat & Dorris
Swatches...

The color is well pigmented & a lovely tone of emerald green. I plan to wear it traditional outfits :)
Now since the festive season is round the corner so I think this is a perfect buy :)
It’s just the perfect brown I was looking for , nicely pigmented and just one stroke of it is required !
Ingredients-
Pros
1-      Easy application.
2-      Affordable.
3-      Highly pigmented.
4-      Wide range of colors available.
5-      Waterproof.
6-      Longer staying power.
Cons
Well honestly speaking I don’t find any negative aspect about the product except for the fact that currently its available only in Mumbai & Pune. Would like to see their stores in Delhi :)
Would I recommend this product ?
Highly recommended especially if you are looking for wide range in gel/cream liners :)
Would I Repurchase?
Yes Yes Yes !!! I have already my co-sister to get more colors for me :)
Rating
10/10
Hope the review is useful for you guys :)

Kannu also has her own blog here